


Showing posts with label basic tips. Show all posts
Showing posts with label basic tips. Show all posts
Saturday, August 3, 2013
Friday, June 21, 2013
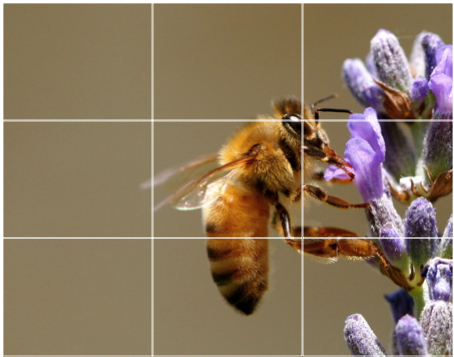
Rule of thirds in photography
For a beginner may be sometimes very difficult to compose the image. Composition is the positioning of the main subject in the frame and the background/foreground. For them the rule of thirds may be very handy.
Even though it is up to the creativity of the photography, it is good to understand the psychology when some one is seeing a picture.
Assume that the total frame of the camera is divided into 9 cells using three vertical and three horizontal lines which are equally spaced. It has been observed that, human eye first catches the corner of centre cell, rather than the exact centre position. So it is always good to position your main subject at any of this four corners. Exact centre may not always catch the attention of the viewer and sometimes they may causally skip that picture.
In your camera, you can enable grid lines in the setting which may help to position the object based on the rule of thirds.
A great explanation of ruel of thirds with examples has been provided at the link below.
http://digital-photography-school.com/rule-of-thirds
Wednesday, May 22, 2013
Getting the most from your digital camera
Seminar on "getting the most from your digital camera" present a detailed introduction to the basics of point and shoot photography, such as composition, light metering etc...
Please go to the link and read the seminar.
Point & Shoot Cameras :: Getting the most from your digital cameraIn case the original URL has got any problem, click this to see the pdf version.
Monday, May 20, 2013
Introduction to basic point and shoot photography
First rule of taking good snaps is get out of the "Auto" mode. You have to use the program mode denoted by "P".
Try to take maximum pictures without flash. While taking an image of subject, take it with different settings like flash on, off etc.. and in different angles.
There are three important point we should keep in mind before taking a picture.
1) Focus : Focus the object what we want get focussed. If the subject is very near to the camera(3 cm if you can make it), turn to the macro mode by using the flower (left navigation) button and selecting macro. Then semi click the shutter button. You will find the focus is locked when you are holding the semi click of shutter button. You can preview the distance and adjust the distance between the camera and the object to obtain a better focus keeping the semi click of shutter pressed.
Now, there is an another facility called AFL (Autofocus lock), means to lock the focus without keeping the shutter button half pressed. First focus the subject ( or any other object ) which is at the same distance as the object. Keeping the half press of shutter down, click the left navigation (flower) button. This should be done in "P" mode. If you have done it correctly, then you should see an "AFL" in the top right corner of the lcd screen indicating that the focus is fixed. now you can take the hands of the shutter button and adjust the distance between the camera and your original subject so that, it is sharply focused. Dont zoom after afl, because it will unlock the afl.
2)Exposure :
Exposure is the time for which the light from the subject is allowed to enter into the sensor. For low light conditions it is very high and for highly lit conditions it is very small. Like focus, exposure is also locked automatically when you semi click the shutter button. You can read the exposure reading in bottom middle , usually denoted like 1/165, 1", 2" 1/1000 etc. This denotes the time in seconds up to which the time is allowed to enter the sensor. Set your exposure as needed so that the subject is well illuminated.
My technique is, first I lock the autofocus AFL but approximating the distance between the subject and camera. The i take the image of subject keeping that AFL locked, so that exposure is varied automatically according to light conditions without affecting the focus.
You can also do Exposure lock, by semi clicking the shutter button and by clicking the right nav button, (but when the flash is turned off)
3) Light metering :
You will not find this setting very easily. While in "P" mode, click menu and you can find this setting. There are three options of light metering; spot, evaluative and centre weighted. This is the technique of evaluating exposure. Evaluative use the full screen to set exposure, centre weighted us the region at centre and spot use a spot(point) to find the exposure.
Last two points are of not much importance and can be adjusted in post editing. Focus, that is important.
Hope you understand at least something..
PS:-
Try to take maximum pictures without flash. While taking an image of subject, take it with different settings like flash on, off etc.. and in different angles.
Your first 10000 pictures will be your worst pictures. So don't hesitate. Keep clicking
There are three important point we should keep in mind before taking a picture.
1) Focus : Focus the object what we want get focussed. If the subject is very near to the camera(3 cm if you can make it), turn to the macro mode by using the flower (left navigation) button and selecting macro. Then semi click the shutter button. You will find the focus is locked when you are holding the semi click of shutter button. You can preview the distance and adjust the distance between the camera and the object to obtain a better focus keeping the semi click of shutter pressed.
Now, there is an another facility called AFL (Autofocus lock), means to lock the focus without keeping the shutter button half pressed. First focus the subject ( or any other object ) which is at the same distance as the object. Keeping the half press of shutter down, click the left navigation (flower) button. This should be done in "P" mode. If you have done it correctly, then you should see an "AFL" in the top right corner of the lcd screen indicating that the focus is fixed. now you can take the hands of the shutter button and adjust the distance between the camera and your original subject so that, it is sharply focused. Dont zoom after afl, because it will unlock the afl.
2)Exposure :
Exposure is the time for which the light from the subject is allowed to enter into the sensor. For low light conditions it is very high and for highly lit conditions it is very small. Like focus, exposure is also locked automatically when you semi click the shutter button. You can read the exposure reading in bottom middle , usually denoted like 1/165, 1", 2" 1/1000 etc. This denotes the time in seconds up to which the time is allowed to enter the sensor. Set your exposure as needed so that the subject is well illuminated.
My technique is, first I lock the autofocus AFL but approximating the distance between the subject and camera. The i take the image of subject keeping that AFL locked, so that exposure is varied automatically according to light conditions without affecting the focus.
You can also do Exposure lock, by semi clicking the shutter button and by clicking the right nav button, (but when the flash is turned off)
3) Light metering :
You will not find this setting very easily. While in "P" mode, click menu and you can find this setting. There are three options of light metering; spot, evaluative and centre weighted. This is the technique of evaluating exposure. Evaluative use the full screen to set exposure, centre weighted us the region at centre and spot use a spot(point) to find the exposure.
Last two points are of not much importance and can be adjusted in post editing. Focus, that is important.
Hope you understand at least something..
PS:-
Some statements are specific to my camera, ie., Canon PowerShot A810. You will be able to find similar facilities in your camera also, but in a different way. Just read the manual supplied with the camera
Subscribe to:
Posts
(
Atom
)
